Setup Your eCommerce Product Catalog from a Spreadsheet

Are you ready to launch e-commerce to allow your members to purchase your food, beverages or merch? Check out this tutorial to get started with a simple excel spreadsheet.


Setting up eCommerce in PeopleVine can be done in one quick shot, by importing your data via a CSV file.  You can import attributes, photos, pricing, prodcut details and more.  Follow these steps to get started:

  1. Visit our guide for importing data at https://peoplevine.com/blog/31021 and find the one for Products.  This will provide you guidance on what fields are out of the box for your import and which ones you to create as attributes.


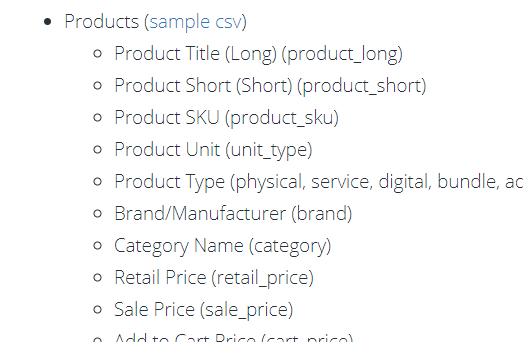
  2. Start by updating your spreadsheet to ensure your column headers are on the first row and ensure the labels correlate to those provided by standard.  


  3. For the ones that you are unable to match, you will need to setup a product attribute.
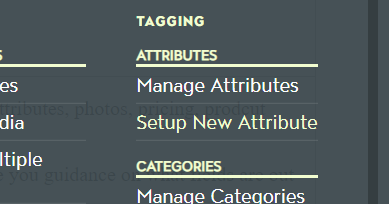
  4. To setup a product attribute, go to the company settings menu and click on Setup New Attribute under the Tagging/Attributes section.


  5. If you are simply importing data as an option for filtering, you can setup a field type of Label.  If you're looking to have someone select an option, then select Dropdown.


  6. You can leave the rest of the options to it's default setting, but feel free to read through and confirm the other settings.
  7. Once your attributes are setup, you can proceed to importing the data by going to the company menu and click on Import Data


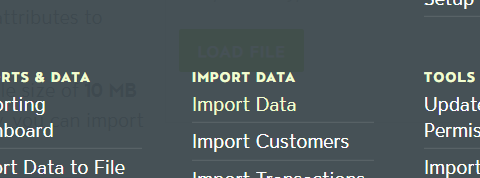
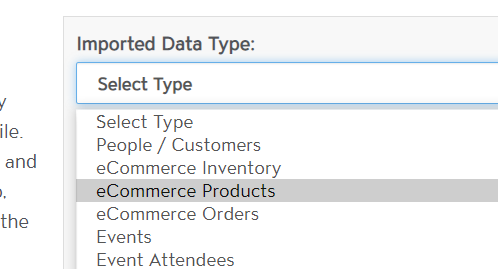
  8. Select to import eCommerce Products, attach your file and then click on Load File.


  9. You will notice that our system has identified your rows and is asking you to map them.  If it identifies a match, it will pre-select for you.


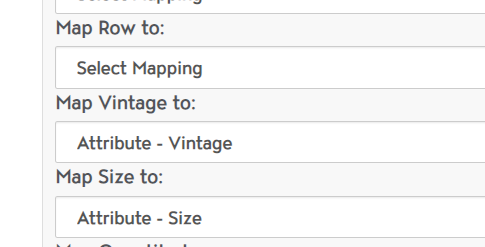
  10. Once your data fields are mapped then click Process Import.
  11. Once your data is loaded, you will receive an e-mail to confrim this.
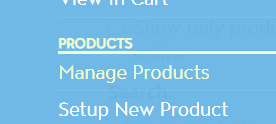
  12. You can confirm that your products are lodaed by going to the Product catalog under Sell > eComerce > Products then click on Manage Products.


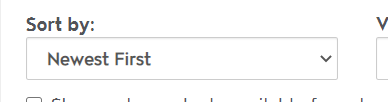
  13. To see the products you just imported, select the sort by filter and selecct Newest First.


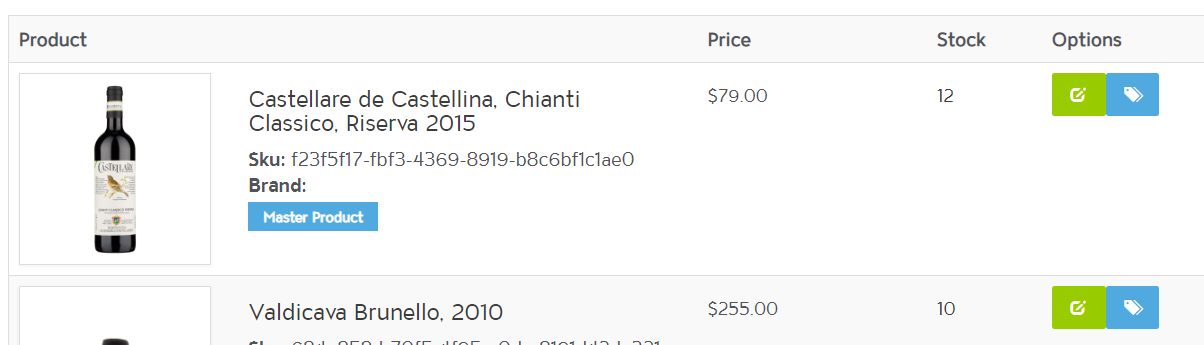
  14. You can now confirm your data is correct and you will see your products live on the website at https://yourcompany.com/shop.


  15. If you imported your products with a category, you may want to ensure those are organized in the correct hierarchy.
  16. Now go to https://yoursite.com/shop to browse your product catalog.

Additional Help Tutorials

Find more ways to grow on PeopleVine.

Configure Salto to Work with Peoplevine Check-In

Follow these steps to configure your Salto to auto Check-In members when they use a Salto keycard.

Posted January 12, 2024

Detailed Member Statements & Billing

Unveiling Peoplevine's Member Statements & Billing feature: a comprehensive tool ensuring utmost transparency, simplicity, and efficiency in every financial transaction for both members and operators.

Posted September 28, 2023

New and Improved Timeline View

Dive into Peoplevine's My Schedule Timeline View: a feature designed to bring unmatched convenience and clarity to members' and guests' schedules, centralizing everything from dining to events.

Posted September 28, 2023

Spa & Wellness Booking with Book4Time Integration

Experience the perfect synergy of Peoplevine and Book4Time: a collaboration that transforms spa and wellness bookings, merging front-end engagement with backend efficiency.

Posted September 28, 2023

Going Global

Discover how PeopleVine's "Global Network" solution is set to revolutionize the hospitality industry by unifying brand experiences across multiple properties, whether globally or within a local region, offering members a seamless digital experience and granting operators unparalleled insights.

Posted September 28, 2023

Override the Guest Pass E-mail with Template

You can replace the e-mail sent to a guest when a guest pass is issued while retaining the necessary links to ensure they can activate it.

Posted September 27, 2023

Transaction Reporting has an Upgrade

We updated the Transaction Reporting screen to provide you with the data necessary to provide a glimpse at your revenue and the necessary data to audit your financials.

Posted September 7, 2023

You Can Set the Time to Process Authorizations

When a charge is processed through your POS, the charge may be Authorized until we capture the tip or at the end of day to handle refunds or changes. In this case, you can now set the time as to when we will process your authorizations.

Posted August 28, 2023

Adding Your Alliants Integration

Follow these steps to connect Peoplevine with your Alliants account for messaging.

Posted August 28, 2023

Setup Your Membership Tiers Based on Age

You can enable your membership tier to be for members between certain ages, when they past that age, they will automatically migrate to the next age tier.

Posted August 22, 2023

Follow these steps to update your Twilio settings to ensure delivery

This article will overview how to setup your brand and campaigns for broader/better delivery.

Posted August 10, 2023

Select Which Transaction Types You Want to Sync with Quickbooks

You're able to select which types of transaction items you want to sync to Quickbooks.

Posted June 14, 2023

Configure your Member Portal to Show Spa and Wellness

Once your Spa and Wellness feature is enabled, you need to configure the following to display on your member portal.

Posted June 14, 2023

Setup a Temporary ID for Hotel Guests

You can allow hotel guests to act as a member during their time at your property by leveraging these settings.

Posted May 23, 2023

© Peoplevine 2024. Powered by PeopleVine. Terms of use | Privacy & cookies